The Great Coat Sew-Along

I’ve signed up for the Great Coat Sew-Along in July. Isn’t that just like me to go and overextend myself yet again? Anyway, I am trying to decide on a design. Notice I said “design” and not “pattern”. I have a feeling that I will be going all Mrs. Stylebook on this one, either drafting the coat from a sloper from scratch, or heavily modifying an existing pattern.  (Because why do anything the easy way, right?)

Here are some of the styles I’m considering:

This coat from Verrier:

Verrier Coat Fall 2008

but below the knee length. Very classic, sort of Little Red Riding Hood, simple lines and the hood gets me out of constructing a collar (but then again, I have to sew an actual, you know, hood).

This coat from Eley Kishimoto:

Eley Kishimoto Fall 2008

No, wait – you have to picture it in different fabrics. I’m thinking not quite so contrasting in color, perhaps a tweed for the body and a subtle plaid or check for the yoke. (Work with me here, folks!)

Then there’s this one from Oscar de la Renta:

OdlR Fall 2008

with a velveteen collar and using the basketweave boucle or wool herringbone from Gorgeous Fabrics (I think this is in the lead at the moment). Not sure if I’d go with fur (fake, of course) at the hem or just leave it plain.

My “classic” fallback coat would be this one from Burberry (hey, they do know how to do coats!):

Burberry Fall 2008 RTW

pretty much in an identical taupe color.

I also like McCalls 5594, but made into longer coat. I would probably have to reduce the amount of gathers, or convert them to tucks/pleats. Also, I would want to lengthen the sleeves.

So, what do you all think? (Go ahead, I won’t take any criticism personally – my taste is all over the map, I know.)

Comments (3)

One more time, with feeling!

Make that TWO more times. As in it’s now been two more times that I have made the Burda WOF #121 top from the 10/1998 issue, for a total of THREE tops.

The second one was made in the same fabric as the first; the color was lime green. I made this one shorter, with 3/4 sleeves, a slightly deeper drape and narrower sholders, and it was fabulous – until I realized I had sewn the back piece WRONG SIDE OUT. Uggggh. I’m not sure it’s all that noticeable (if it were, don’t you think I would have sewn the damn thing together the right way?), so I may still wear it out in public. God knows it fits better than the first one does.

The third one was made from this polyester/Lycra knit from Gorgeous Fabrics:

This fabric has much better recovery, so much better that I think the shoulder width on my adjusted pattern could have been slightly INCREASED. But the drape is wonderful! Will post pictures soon, I promise!

Even though I’m still having problems sewing knits on my machine, this one came out SO much better than the first two. I used Steam A Seam 2 Lite and water soluble Wonder Tape, which certainly helped, but I can’t for the life of me get any decent-looking twin needle topstitching. I even bought a stretch twin needle, although i haven’t used it *with* the Wonder Tape yet, so there may still be hope for me.

I also started on a matching skirt, New Look 6735:

I was able to cut it out and sew the six skirt panels together this morning (I used the Wonder Tape on each, they went together beautifully!) and now all I need to do is finish the waistband and hem it. The pattern calls for 3/8″ elastic, but after reading some of the reviews, I think I am going to cut a separate waistband, stretch-and-sew it to the top of the skirt, then run a 1″ wide band of knitted elastic through it. Just holding the skirt up around me, I can already tell I’m going to like it when it’s done.

The only (minor) screw up I made on the skirt was cutting the center front and left front panels in virtually the same location on my fabric, so the pattern repeat…well, it *repeats*, sort of. It’s a very busy print, though, so I think it’s unlikely that it will be terribly noticeable to anyone but myself. And if it DOES turn out to be really annoying, I can always turn those panels around to the back and just pretend not to notice.

Leave a Comment

We interrupt this dress…

…to bring you this Burda World of Fashion top, #121 from the 10/1998 issue. You can read my review of the pattern here.

I really needed to make (read: FINISH) something FAST, and this seemed perfect. I have a similar RTW top in black that I really like (except for the constant pulling down in front, of course!) and it’s generally quite flattering, so I thought I’d whip up another one. You know, in an hour. Or maybe two…

…Four days later, I’m done. I learned a lot from sewing this top:

  • Marcy Tilton wasn’t exaggerating when she wrote that “multisized Burda patterns tend to have broad shoulders.” I just wish I’d read the article before I sewed my sleeves in and trimmed the sleeve allowances to 1/4″. Also, I think her idea of putting the dart in the armhole (I watched part of her t-shirt fitting video on YouTube where she mentioned this), rather than the side seam, is a good one, although she did comment that the dart there shouldn’t be more than 1/2″ – hmmmmm.
  • *Some* FBA is better than none at all, but I could have used even more. I also think I could have started with a size 38 instead of a 40, which would help somewhat with the shoulder seam length and armhole depth, as well as the waist and hip circumference (which were a bit too loose).
  • I need to go back and re-measure my RTW top and compare its length (particularly the armhole depth) and width measurements to my pattern and the top I just finished. I think I may find a few more clues to improving the fit there.
  • I’ll use clear elastic to stabilize the back neckline and shoulder seams, instead of interfacing and bias tape, which were a monumental pain in the butt.
  • I’m going to use a PRINT fabric next time, which will hide my stitching boo-boo’s better.

Leave a Comment

No, really, I’m still here

Sorry for the lack of posting recently.  I realize it’s been about two weeks now – BAD BLOGGER! BAD BLOGGER!!

The dress is giving me some grief.  Not enough to make it a wadder, mind you, but enough that I’ve decided to re-cut the bodice and make it princess seamed instead.  Today I cut out a muslin for the princess seam version, and it fits well, but I think I need to add a little more length in the center front.  So tomorrow I will cut one more muslin version, put the finishing touches on it, then I’m going to cut my fabric out and finish the sucker.  I need to re-do a couple of the pleats on the front skirt so they line up with the princess seams, but that should be a pretty simple task, just scooting them over towards the center by 3/8″ (or was it 3/16″? Eh, it will be obvious once I rip out the existing pleats).

I’m hoping to have it done by the end of the week to wear to a church dinner on Sunday night (assuming the weather’s improved by then, of course).  Right now I’m listening to the pouring rain outside.  The don’t call it Mud Season for nothing, you know!

Leave a Comment

Score!

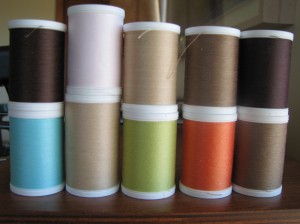
I was at Jo-Ann Fabrics to get thread for my dress on Monday – they were having a 50% off sale on all thread, so I scooped up several spools to go with all the fabric I bought recently. These are the colors of my spring-wardrobe-to-be:
Thread

Basically, it’s shades of brown/tan/cream with orange, lime green and turquoise accents. Oh, yeah – and a pale pink sundress.

Woo-hoo!

Leave a Comment

One step forward, two steps back

I came upstairs at 8:00 to start sewing, but spent an hour wrestling with my sewing machine’s tension before I realized i was TRYING TO SEW WITH TOPSTITCHING THREAD. GAAAAH!! Fortunately, I was just messing around with scrap fabric, so no actual garments were harmed. I switched to regular thread (need to get better matching thread at JA’s tomorrow) to test out stitch lengths and widths, and promptly proceeded to melt holes in my lovely pink burnout fabric when I pressed my seams open. Again, it was just scrap fabric, but…sheesh!

Good thing I am taking my sweet time with this project, huh?

Leave a Comment

Making progress

I cut the straps and pinned them on. Because the dress’ straps are curved, they are slightly on the bias in some places. I think that’s one reason the pattern calls for interfacing them. My fabric is sheer, so I won’t be using a normal non-woven interfacing. I think I may underline it in a nylon organza instead.

I mentioned in a previous post that I have a lower shoulder on one side, but that it wasn’t a big deal. Ha! I have now realized that in a fitted, empire waist sundress, it is a rather big deal after all. My right shoulder is definitely lower than the left – enough so that I had to pin out more than an inch of extra fabric on the strap on that side of the dress. With DH’s help, I was finally able to get them pinned in place so that they cover my bra straps. I think I will add those little thread chains with snaps to the underside of the strap at the top of my shoulder, just to ensure that my bra straps don’t peek out. The straps are still just a teensy bit loose, and move around when I do (it’s most noticeable in the back, the front is pretty stable) but I think that may be because there’s no skirt attached -yet- to the bodice to weigh it down all around. Worst case scenario, I’ll just make the straps a bit more snug when I attach them on the actual dress. (Worst-WORST case scenario, I’ll end up re-cutting the straps more on the bias than they already are.)

I’m getting very close to being ready to cut my fabric out. I have made a vow to start cutting away my pattern lines completely after reading the tutorial about it on the Fashion Incubator website. I have always wondered where you were supposed to cut – outside, inside or right on the middle of the cutting line. Well, now I finally know!

Leave a Comment

I think I can, I think I can…

Well, my adventures in FBA continue.

The gapping is gone – I took a slightly deeper (1/4″) seam allowance on the part of the front bodice above the dart. In effect, I took a vertical dart at the side seam. I know the dart is still too long, but I’m not quite sure what to do about it. If I make if shorter, I’m going to end up with an even greater “bubble” at the tip of the dart than I have now. I’m not sure how much I can ease the fabric over my pressing ham.

I know, I know – it’s a bit too snug at the moment. I need to let the CB seam out. I had taken it in quite a bit (2″ or so total) in order to get it to stay up. With the straps sewn on, that won’t be as much of an issue. Also, I’m going to need more room to accommodate the lining fabric.

From this view, it looks like I still need to add length to the front, but I think that’s because the bodice back is hanging down. I suppose the only way to know for sure is to go cut those straps out and pin them on, huh?

(Boy, this is taking an awful long time to figure out! It better look a-freakin’-mazing when I’m done.)

Leave a Comment

So I lied.

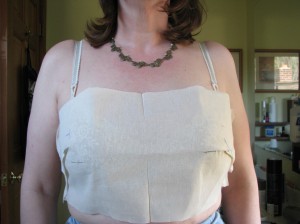
OK, I’m not starting with the blouse – I’m diving in with McCall’s 5315. (It was in the upper 60’s here today – can you really blame me for wanting to jump right into Spring sewing?) I’ve cut the bodice in muslin to check the fit – good thing, too, as it’s pretty lousy, even though I’m using the D cup Made-For-You pattern piece:

Bodice front (muslin)

This front view shows the original dart position on the left (which is really my right), and the lowered and shortened dart on the right (my left side). The straight pin is over the bust point on the left (my right) – well, it was over the bust point before I changed the left side dart, here it’s drooped down a bit. I should have taken a photo before I lowered the dart so you could better see the difference between the two. (You might notice that the CF fold is slightly tilted towards my right – if it were perpendicular to the floor, the dart would be raised a bit higher. In any case, you’ll just have to take my word for it that the original dart was too high and too long.

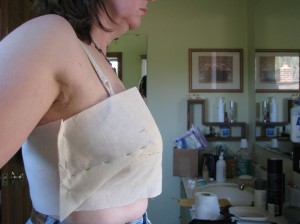
Here’s another view of the original dart from the right (note to self: you really need to clean that bathroom counter off before taking any more pictures):

Original (right) dart

Again, you can see that if the bodice were pulled up so that the pin marking the bust point was actually AT my bust point, the original dart was too high. (Also, notice how the upper edge of the bodice does not lie flat against my upper chest.)

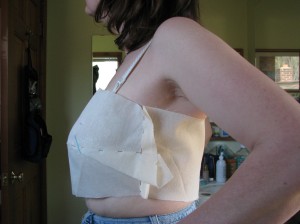
And the lowered dart on the left:
Left dart (lowered and shortened)

The upper edge of the bodice gaps – I’m thinking that I need to take more fabric out with a wider dart angle. (Criminy, that dart is already ginormous!). But when I pinch out the excess fabric to smooth the gaping, it causes the lower edge of the bodice to curve up. I think I need to add more length to the bodice. And I think I need to add another 5/8″ to the upper edge (front and back), because right now the upper edge is just about where I want it to be in the finished dress.

What do you all think?

Leave a Comment

Embarrasment of riches

I went a little insane at the fabric store today. OK, make that a LOT insane. But I have an excuse, really, a good one. You see, I went to get a few patterns and I walked out with mumble-mumble-hundred dollars worth of fabric.

(Oh crap, I wanted to tell you exactly how much I spent BUT I CAN’T FIND THE FRIGGIN’ receipt! Hope I manage to find it before DH does…)

Wait, that’s not an excuse, that’s just what happened. How it happened was I went to Massachusetts today (2 1/4 hr. drive) to take a former co-worker and dear friend out to lunch. Since she had to pick up her kids after school (and I was going to make a detour to the fabric store in the opposite direction), we decided to take separate cars to the restaurant at the “Natick Collection” (the old Natick Mall). Just as we were about to enter the restaurant parking lot, my cell phone rang. It was my friend, calling from her car in front of me at the stoplight. She had just gotten a phone call from her daughter’s school, telling her to COME GET HER SICK KID.

ARGGGGHHH!

Read the rest of this entry »

Comments (1)

Older Posts »